Today marks the 100 days of school. When I was a classroom teacher, the 100 days wasn't really a big event. But as a technology coach, I have become part of a Kindergarten tradition, the 100 days celebration, and what better way to celebrate ??? Making students 100 years older. This is an activity I was asked to do my first year as a technology coach and it now has become a tradition.
I have tweaked the workflow over the years, but here is what works for me:
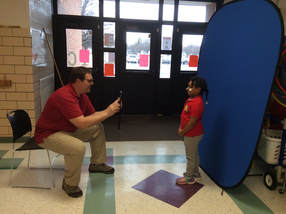
1. I set up the green/blue screen
2. I make sure my iPad ready with the app "AgingBooth"
3. I take a picture of the classroom number that I'm getting ready to take pictures of, (or write the number in pages on my iPhone and take a picture of it.) This way I know when one room ends and the next one begins in my photo library.
4. Take one picture of the student and then use the app to make them age, and save the "old" picture. (This way my photo library has the pictures in order: Student young-then old, Student young-then old. etc. This makes it much easier when I import the pictures into the slideshow app.)
5. When I'm done I air drop all pictures, one classroom at a time, to my MacBook
6. Finally I create the slide show in "FotoMagico5". I like this app because I can time the music to the pictures quickly, and it offers me a lot of control over many parts of the show.
7. The final videos are posted on Drive and shared out.
This workflow has worked out for me. Today I started at 8:00am, took about 70 pictures, and created another 70 aged pictures, placed them into 4 separate slide shows with music, and had the final product posted to the teachers by 3pm. Not bad for a days work.
Here is a link to one of the finished videos: Room 103 2018.m4v - Google Drive
I have tweaked the workflow over the years, but here is what works for me:
1. I set up the green/blue screen
2. I make sure my iPad ready with the app "AgingBooth"
3. I take a picture of the classroom number that I'm getting ready to take pictures of, (or write the number in pages on my iPhone and take a picture of it.) This way I know when one room ends and the next one begins in my photo library.
4. Take one picture of the student and then use the app to make them age, and save the "old" picture. (This way my photo library has the pictures in order: Student young-then old, Student young-then old. etc. This makes it much easier when I import the pictures into the slideshow app.)
5. When I'm done I air drop all pictures, one classroom at a time, to my MacBook
6. Finally I create the slide show in "FotoMagico5". I like this app because I can time the music to the pictures quickly, and it offers me a lot of control over many parts of the show.
7. The final videos are posted on Drive and shared out.
This workflow has worked out for me. Today I started at 8:00am, took about 70 pictures, and created another 70 aged pictures, placed them into 4 separate slide shows with music, and had the final product posted to the teachers by 3pm. Not bad for a days work.
Here is a link to one of the finished videos: Room 103 2018.m4v - Google Drive
 RSS Feed
